-
Feature Request
-
Resolution: Done
-
Major
-
4.12.0.AM1
For the server adapters in tools/as we have UI that allows a user to set the name of the deployment archive. We're missing this feature for the OpenShift server adapters currently. We're asked to add it.
Steps:
- EXEC: create a new app by using the jboss-webserver31-tomcat8-openshift:1.2 builder image
- ASSERT: websocket-chat application is imported into your workspace
- ASSERT: server adapter jboss-webserver31-tomcat is created
- ASSERT: In OpenShift explorer, below the service jboss-webserver31-tomcat*, you have the running pod (build is finished, pod running)
- EXEC: start the server adapter
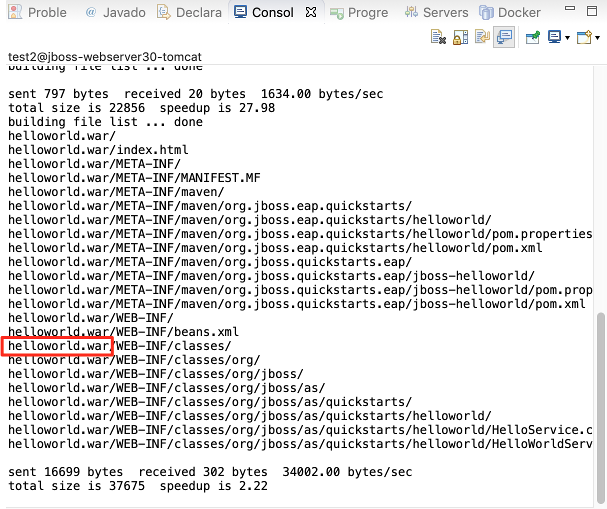
- ASSERT: RSync is executed and the output is visible in the "Console"
Result:
If you look closely at the output you see that the project is synced to the pod in a folder called websocket-chat.war (webapp is accessible at <host>/websocket-chat/)

Expected result:
I should be able to set the output folder to anything I want. Ex. we have a customer that wants the application war to be synced up into a folder ROOT (without the extension .war).
Currently, to achieve this I have to do the following:
- EXEC: create the following xml snippet (notice the outputName property for the module)
and make sure it reads as follows:<?xml version="1.0" encoding="UTF-8"?> <deployment> <local> <module id="org.eclipse.jst.jee.server:websocket-chat"> <property key="tempLocation" value="" /> <property key="location" value="" /> <property key="outputName" value="ROOT" /> </module> </local> </deployment>
- EXEC: html-encode, join it into a single line and copy it (into the clipboard)
- EXEC: open the properties for the server adapter and hit "Switch Location"

- ASSERT: in my workspace, a new project Servers is created. It contains the configuration for my server adapter.

- EXEC: open the file with the XML Editor
- EXEC: in your XML Editor: go to the end of the line <server auto-publish-setting="2" and insert your html-encoded xml as a value to the attribute org.jboss.ide.eclipse.as.core.util.deploymentPreferenceKey="
<?xml version="1.0" encoding="UTF-8" standalone="no"?> <server auto-publish-setting="2" auto-publish-time="2" hostname="jboss-webserver31-tomcat-test.192.168.64.76.nip.io" id="test@jboss-webserver31-tomcat" id-set="true" name="jboss-webserver31-tomcat (Service) at OpenShift 3 (192.168.64.76)" org.jboss.ide.eclipse.as.core.server.IGNORE_LAUNCH_COMMANDS="true" org.jboss.ide.eclipse.as.core.server.deployDirectoryType="custom" org.jboss.ide.eclipse.as.core.server.serverMode="openshift3" org.jboss.ide.eclipse.as.core.server.webPort="80" org.jboss.ide.eclipse.as.core.server.webPortAutoDetect="false" org.jboss.ide.eclipse.as.core.server.zipDeploymentsPreference="true" org.jboss.tools.openshift.Connection="https://developer@192.168.64.76:8443" org.jboss.tools.openshift.DeployProject="websocket-chat" org.jboss.tools.openshift.PodPath="/opt/webserver/webapps" org.jboss.tools.openshift.SERVER_START_ON_CREATION="false" org.jboss.tools.openshift.Service="test@jboss-webserver31-tomcat" org.jboss.tools.openshift.SourcePath="${workspace_loc:/websocket-chat}" port="80" runtime-id="test@jboss-webserver31-tomcat" server-type="org.jboss.tools.openshift.server.type" server-type-id="org.jboss.tools.openshift.server.type" start-timeout="450" stop-timeout="450" timestamp="2" org.jboss.ide.eclipse.as.core.util.deploymentPreferenceKey="<?xml version="1.0" encoding="UTF-8"?> <deployment> <local> <module id="org.eclipse.jst.jee.server:websocket-chat"> <property key="tempLocation" value="" /> <property key="location" value="" /> <property key="outputName" value="ROOT" /> </module> </local> </deployment>"> <list key="modules" value0="websocket-chat::org.eclipse.jst.jee.server:websocket-chat::jst.web::3.0"/> </server>
- EXEC: Save the editor and restart the server
Result:
Syncing now happens into a folder ROOT

- causes
-
JBIDE-26797 Invalid - 2 subsystems have been declared with the same unique id: deploymentPage.standard
-
- Closed
-
- is incorporated by
-
JBDS-4779 Server adapter: should be able to freely set a war name [JBIDE-26694]
-
- Open
-
- is related to
-
JBIDE-26744 Server adapter: "Clean" required after changing the war name
-
- Closed
-
-
JBIDE-26746 Deployment Page: changing location, deploys to new war but wont remove old one
-
- Closed
-
-
JBIDE-26754 Deployment Page: changing location, app not accessible
-
- Closed
-


